My son came home from church last week with this craft. He has already misplaced the polished rock decorated with cross stickers, so we've been busy making more painted prayer rocks at home. I found sealing with Modge Podge worked well to make an ordinary outdoor rock smooth and polished. We'll place them in a little wooden prayer-rock box on top of his dresser. If you decide to make a one at home with your child, remember to use a Sharpie to write their name and the date on the bottom.
(what a great childhood treasure to keep forever!)
PRAYER ROCK
(Author Unknown)
I'm your little prayer rock and this is what I'll do.
I'm your little prayer rock and this is what I'll do.
Just put me on your pillow 'til the day is through.
Then turn back the covers and climb into your bed,and, whack!
Then turn back the covers and climb into your bed,and, whack!
your little prayer rock will bump you on the head.
Then you will remember as the day is through,
Then you will remember as the day is through,
to kneel and say your prayers as you intended to.
Then when you are finished dump me on the floor.
Then when you are finished dump me on the floor.
I'll stay there through the night time to give you help once more.
When you get up next morning,clunk!
When you get up next morning,clunk!
I stub your toe,
so that you will remember your prayers before you go.
Put me back upon your pillow when your bed is made,
Put me back upon your pillow when your bed is made,
and your clever little prayer rock will continue in your aid.
Because your Heavenly Father
Because your Heavenly Father
cares and loves you so,
He wants you to remember
to talk to Him, you know.


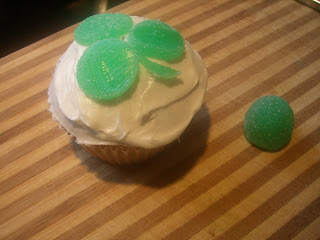 Add rainbow sprinkles to the edge.
 Place the rainbow flavors of Jello in 6 separate bowls. Use 2 small boxes of Jello per bowl. Work with one flavor at a time. Don't try to make all the flavors at once as the Jello will solidify as you work. (personal experience) Mix 1.5 cups boiling water into the first bowl. Stir 2 minutes until dissolved. Pour 1/2 the red mixture into the prepared baking pan (it'll be a very thin layer but should cover the bottom) and refrigerate for 15 minutes. I found setting my oven timer for 15 minutes helped me keep track of all the 15-minute intervals.
  While the first layer is chilling in the refrigerator add a heaping Tablespoon of Cool Whip to the remaining red Jello. You don't want too much Cool Whip as your layer will be too pale, but you do want enough to make the layer opaque. I found the heaping Tablespoon to be sufficient. (note: you can also use lowfat vanilla yogurt or sour cream instead of Cool Whip to make your layer opaque)
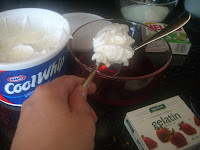 The more room temperature your Cool whip the smoother the layer will look. This Cool Whip started out frozen so I whisked it for a few minutes to make it look less chunky. (I rarely plan ahead enough to let things thaw before baking with them) As I worked on each layer the Cool Whip thawed and became easier to work with.
 When the first layer is chilled enough to be firm but still tacky, pour the red Cool Whip layer to the top. 2 notes: 1)Don't leave the layers in longer than 15 minutes. This will cause the layers to be so firm that they won't stick to each other and will cause the layers to slide off each other in the end. 2)Pour the mixture onto a spoon to elimintate the stream from breaking the surface tension of the privious layer. This will eliminate a hole being created into a layer.
 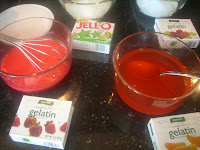 After you repeat these steps for each layer (12 total...see I told you you'd be in the kitchen all day) put the final product in the refrigerator to chill at least 2 hours. I left mine in overnight covered with plastic wrap.
 This it the end result.
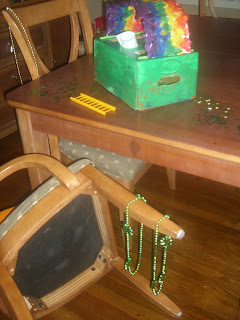
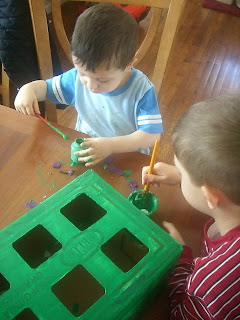 We set up our trap the night before St. Patrick's Day and N found a toy ladder to help the Wee One out.
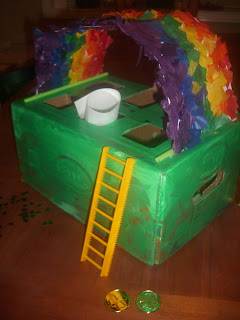


